Featured

Iteration 3: Close phase

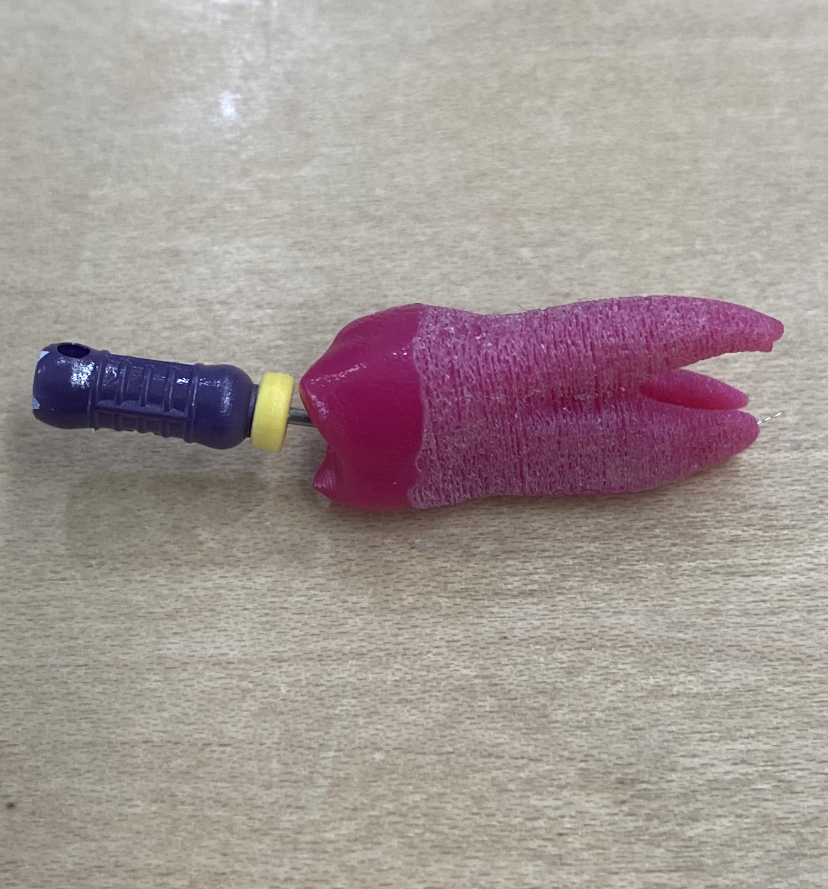
My deliverables for this project are the teeth you can see below and the 3D tools that are also in the images below. There is still work that needs to be done on these two things but my final deliverable was to have an iteration of teeth that were approved and we did a very good job on that.

Lessons that I learned from this project are that you never really stop learning about a software you work on. I am still learning more and more about Blender in order to get the tools exported for use, and that is still a process that takes some time. Along with that I also learned a how to use MeshMixer and what it was. But professionally I learned how to have proper communication when working with a team in different places, InWorks is their own lab in one part of the medical campus while Dr.G is in another and then I was in Boulder. We had to have proper communication in order to make this project successful.

Technical review for this project, the surgical tools still need some work on them in order to export them with the material and shaders. Currently I am unable to export them with materials from blender but I am working on it and getting close to a solution. The teeth are basically done its just making more models to print and adding a little bit of something that will make it more cleared in xrays the separation between the outer part of the tooth and the inside part. Other than that it has gone well and I got most of my MVP done.

For future plans this project will still continue on being worked on, the tools still need a solution to exporting them with full material and shaders on them and the teeth are great but we wanted to also get them into a state where they look almost identical to the ones that are $20. I will still be fallowing this project until I can and continue working on things as much as I can. Hopefully by June the surgical models will be exportable and we can implement them into student use.

Iteration 3: Adapt phase

For my adapt phase I got some feed back from both sides of my project, but starting out with my models those have been taking time to get them to work. I showed Dr.G the models of the tools and he gave back really good feedback on them, he really liked how they looked in Blender the models looked like what he wanted. But due to not being able to transfer them to virtual reality space with the metallic look and material we felt a little disappointed. He tried to help out in finding a solution but in the end we weren’t able to do it, but I am continuing to find some kind of solution. I did talk with some of the doctors that want to use these for their classes this summer and we have a set date to try to get some done, so I will be working with this after finals to hopefully have them looking more realistic.

With the teeth we did get some feedback from Inworks about the sizing, the first batch of teeth from this iteration did come out super small so I had to go back into MeshMixer and change the scaling and make sure they were right in the file. After changing the scaling of the teeth we got a new batch of teeth and they look better and better each time, we are still working on making them have more difference in the x-ray part. I have tried to do some research on this but it was kind of hard because we can’t add things to the 3D mixture which makes it a little hard. But we are continuing to figure out different ways to get them to show up more on x-rays just like real teeth.

Iteration 3: Explore phase

For iteration 3 I was able to get the 3rd tooth into Mesh Mixer and set for 3D printing, this tooth was a little different from the previous teeth. This tooth was an upper molar, enamel with a dentin in order to achieve a more realistic looking tooth and everything was separated into layers so we can achieve a 3layer 3D print. We are currently waiting on Inworks so we can continue developing the teeth, but we are getting close.

During this iteration because I had to wait on the teeth files to be looked at and printed I worked on the 3D models of the surgical tools. I finalized and cleaned up the 3rd model and applied the material too it so that it looks like a real tool. I borrowed an iPhone and Mac in order to transfer the models into an apple software to test out the models in a different 3D environment. Although I am having trouble with the transfer of models, the models themselves show up perfect but the material and shaders don’t show up which is a major problem after spending ours making them. I am searching for a solution currently and I think I have come close to finding it, hopefully I will be able to have it done by next week.

During this iteration I spent most of my time figuring out the surgical tools which I spent about 4hrs finishing cleaning up and adding material to the 3rd model. Then I spent about 8 hours through the week trying to figure out why my models didn’t show up with some of the materials, which then lead to me to trying out solutions. The rest of my 24hrs I spent working on the tooth making sure it was correctly detailed and set for 3D printing. I did get feed back that the sizing was different from our first print so I went in to figure that out and make sure that everything looked correct. During this iteration I did take time to recover from covid so I might not have done a lot of work but I did try my best, as well as Inworks being delayed because some of the team we work with took time off. So we are still in the process of printing the 2nd batch of teeth.

Iteration 3: Speculate phase

  • Model 3 Tooth
    • Loading in the references and scaling them (1hr)
    • Modeling based on reference (2-6hrs)
    • adding the material to the model (2hrs)
    • render the model (2hrs)
    • export the model (1hr)
    • Get feed back (1hr)
    • Implement feed back (2hr)
    • Send to 3D printer for test printing
  • Work on 3nd model ( 1 week)Loading in the model into Blender (1hr)
    • Sculpting the details into the pliers (1-4 hrs)
    • Taking model 1’s color and shading and applying it to this mode (1-2hrs)
    • render the model (1-6 hrs)
    • Export the model (1-2hrs)
    • Get feed back (1hr)
    • Implement feed back (3hr)
  • Testing out the mobility of the models (3hrs)
  • Import surgical models into the 3D environment (2-6hrs)
  • Model 2 Tooth
    • Loading in the references and scaling them (1hr)
    • Modeling based on reference (2-6hrs)
    • adding the material to the model (2hrs)
    • render the model (2hrs)
    • export the model (1hr)
    • Get feed back (1hr)
    • Implement feed back (2hr)
    • Send to 3D printer for test printing
  • Model 4 Tooth
    • Loading in the references and scaling them (1hr)
    • Modeling based on reference (2-6hrs)
    • adding the material to the model (2hrs)
    • render the model (2hrs)
    • export the model (1hr)
    • Get feed back (1hr)
    • Implement feed back (2hr)
  • Model 1 Surgical pliers
    • Loading in the model into Blender (1hr)
    • Sculpting the details into the pliers (1-4 hrs)
    • Coloring (1-2 hr)
    • Shading (1-6 hrs)
    • Adding metallic shading (1-4hrs)
    • render the model (1-6 hrs)
    • Export the model (1-2hrs)
    • Get feed back (1hr)
    • Implement feed back (3hr)
  • Research on material that can be used for 3D printing (2hrs a day)
  • Contact other partners about ways of printing (1-4hrs week)

Work Plan for iteration 1:

  • Model 3 Tooth
    • Loading in the references and scaling them (1hr)
    • Modeling based on reference (2-6hrs)
    • adding the material to the model (2hrs)
    • render the model (2hrs)
    • export the model (1hr)
    • Get feed back (1hr)
    • Implement feed back (2hr)
    • Send to 3D printer for test printing
  • Work on 3nd model ( 1 week)Loading in the model into Blender (1hr)
    • Sculpting the details into the pliers (1-4 hrs)
    • Taking model 1’s color and shading and applying it to this mode (1-2hrs)
    • render the model (1-6 hrs)
    • Export the model (1-2hrs)
    • Get feed back (1hr)
    • Implement feed back (3hr)
  • Import surgical models into the 3D environment (2-6hrs)
  • Contact other partners about ways of printing (1-4hrs week)
  • Work on adding shaders and material to other 3D models

The colors of the text represent how important the task are to do, red means they are the most important thing that needs to be done in this iteration. Yellow means that they are important but can be worked on when waiting on things that are red. Purple means things that are not important now but will be part of future iteration but can be pushed off for now. Green means that it has been completed in past iterations.

Iteration 2: Adapt phase

During this phase there wasn’t a lot to adapt because the main feedback I got back was positive from the head of orthodontics. Instead I continued to work on another variation of a tooth for 3D printing and continued to clean the surgical tools. The feed back I got I actually put it at the end of the explore phase in iteration 2 which you can refer too. Other than working on the next models I didn’t do a lot more than that, but I can say the next tool model we added another layer to the teeth in order to make them more realistic. and those have been sent to be 3D printed so hopefully within the next couple of days I will be getting feedback on those models.

Iteration 2: Explore phase

For my iteration 2 I was able to accomplish getting the teeth models prepared for printing and then sent off to the company we are working with (Inworks) to 3D print it. I also took the time while waiting for the teeth to be printed to clean up a couple of surgical tools that were scanned in, which are actually taking a while because when they are scanned in they have a base that they are sitting on which requires some removing in the software. So I had to take some time to do that and set them up to be ready to be imported into Blender. After we were notified that the teeth have been printed Dr.G took the teeth to test out the material, he drilled into them like he would the lab teeth and found that they are compatible with what we needed. Even the root canal was made perfectly and the material imitated the texture of a real tooth. The Endodontics Department Chief, Dr. Emanouela Carlson evaluated the prototype 3D printed tooth and she gave a pass to them, which is a great success for us.

The entire 24hrs I took about a Day to clean up the model of the tooth and have it set for 3D printing then sent it to Inworks to have it printed. After I took the rest of the time to clean up a couple of the tools, and those take a good 5-6 hours to properly clean up sometime more if they want to be done really well and polished. I still haven’t loaded them into blender but will be doing that in the next few days.

Iteration 2: Speculate phase

Total feature list:

  • Model 2 Tooth
    • Loading in the references and scaling them (1hr)
    • Modeling based on reference (2-6hrs)
    • adding the material to the model (2hrs)
    • render the model (2hrs)
    • export the model (1hr)
    • Get feed back (1hr)
    • Implement feed back (2hr)
    • Send to 3D printer for test printing
  • Work on 3nd model ( 1 week)Loading in the model into Blender (1hr)
    • Sculpting the details into the pliers (1-4 hrs)
    • Taking model 1’s color and shading and applying it to this mode (1-2hrs)
    • render the model (1-6 hrs)
    • Export the model (1-2hrs)
    • Get feed back (1hr)
    • Implement feed back (3hr)
  • Testing out the mobility of the models (3hrs)
  • Import surgical models into the 3D environment (2-6hrs)
  • Work on 3nd model ( 1 week)
    • Loading in the model into Blender (1hr)
    • Sculpting the details into the pliers (1-4 hrs)
    • Taking model 1’s color and shading and applying it to this mode (1-2hrs)
    • render the model (1-6 hrs)
    • Export the model (1-2hrs)
    • Get feed back (1hr)
    • Implement feed back (3hr)
  • Model 4 Tooth
    • Loading in the references and scaling them (1hr)
    • Modeling based on reference (2-6hrs)
    • adding the material to the model (2hrs)
    • render the model (2hrs)
    • export the model (1hr)
    • Get feed back (1hr)
    • Implement feed back (2hr)
  • Model 1 Surgical pliers
    • Loading in the model into Blender (1hr)
    • Sculpting the details into the pliers (1-4 hrs)
    • Coloring (1-2 hr)
    • Shading (1-6 hrs)
    • Adding metallic shading (1-4hrs)
    • render the model (1-6 hrs)
    • Export the model (1-2hrs)
    • Get feed back (1hr)
    • Implement feed back (3hr)
  • Research on material that can be used for 3D printing (2hrs a day)
  • Contact other partners about ways of printing (1-4hrs week)

Work Plan for iteration 1:

  • Model 2 Tooth Loading in the references and scaling them (1hr)
    • Modeling based on reference (2-6hrs)
    • adding the material to the model (2hrs)
    • render the model (2hrs)
    • export the model (1hr)
    • Get feed back (1hr)
    • Implement feed back (2hr)
    • Send to 3D printer for test printing
  • Import surgical models into the 3D environment (2-6hrs)
  • Contact other partners about ways of printing (1-4hrs week)
  • Work on adding shaders and material to other 3D models

The colors of the text represent how important the task are to do, red means they are the most important thing that needs to be done in this iteration. Yellow means that they are important but can be worked on when waiting on things that are red. Purple means things that are not important now but will be part of future iteration but can be pushed off for now. Green means that it has been completed in past iterations.

Iteration 1: Explore phase Updates

For this iteration I was able to accomplish my goal in making the tools look more realistic with a metallic finish on them. Although by the time we are discussing this I still haven’t pushed it into the 3D environment I am working on that in the next couple of days. I was able to show Dr.G the models and get some feed back from him about them and I am changing some of the shadings to make it more to what they are expecting.

I spent my 24 hrs modeling more of the tools to make them look more realistic, that took about 4 hrs to make them look more detailed. Then it took me another 4 hrs to get the shading right of the metallic look, although I could have done it in less time some of the textures kept making my computer lag and tool longer. I spent time researching how to make the model move so it makes it more appealing to the student, I took about 3hrs to research and then another 2 hrs to try it on a different file. I sent the file over to Dr.G to get his feedback and in the mean time I took the time to research about modeling the tooth that was sent to me, which took about 2hrs for that. I went looking for programs to model the tooth so that we can have a multi layer tooth and that took about 1hr. The other 4hrs I spent time talking with Dr. G and a company that will be helping with 3D printing as well as taking the input about the tools. I started working on the updates on the tools for 1hr but the next 3hrs I will be working on in the next couple of days.

Iteration 1: Speculate phase

Total feature list:

  • Model 1 Surgical pliers
    • Loading in the model into Blender (1hr)
    • Sculpting the details into the pliers (1-4 hrs)
    • Coloring (1-2 hr)
    • Shading (1-6 hrs)
    • Adding metallic shading (1-4hrs)
    • render the model (1-6 hrs)
    • Export the model (1-2hrs)
    • Get feed back (1hr)
    • Implement feed back (3hr)
  • Testing out the mobility of the models (3hrs)
  • Model 2 Tooth
    • Loading in the references and scaling them (1hr)
    • Modeling based on reference (2-6hrs)
    • adding the material to the model (2hrs)
    • render the model (2hrs)
    • export the model (1hr)
    • Get feed back (1hr)
    • Implement feed back (2hr)
  • Import surgical models into the 3D environment (2-6hrs)
  • Work on 3nd model ( 1 week)
    • Loading in the model into Blender (1hr)
    • Sculpting the details into the pliers (1-4 hrs)
    • Taking model 1’s color and shading and applying it to this mode (1-2hrs)
    • render the model (1-6 hrs)
    • Export the model (1-2hrs)
    • Get feed back (1hr)
    • Implement feed back (3hr)
  • Model 4 Tooth
    • Loading in the references and scaling them (1hr)
    • Modeling based on reference (2-6hrs)
    • adding the material to the model (2hrs)
    • render the model (2hrs)
    • export the model (1hr)
    • Get feed back (1hr)
    • Implement feed back (2hr)
  • Research on material that can be used for 3D printing (2hrs a day)
  • Contact other partners about ways of printing (1-4hrs week)

Work Plan for iteration 1:

  • Model 1 Surgical pliers (1 1/2 weeks)
    • Loading in the model into Blender (1hr)
    • Sculpting the details into the pliers (1-4 hrs)
    • Coloring (1-2 hr)
    • Shading (1-6 hrs)
    • Adding metallic shading (1-4hrs)
    • render the model (1-6 hrs)
    • Export the model (1-2hrs)
    • Get feed back (1hr)
    • Implement feed back (3hr)
  • Import surgical models into the 3D environment (2-6hrs)
  • Research on material that can be used for 3D printing (2hrs a day)
  • Contact other partners about ways of printing (1-4hrs week)